


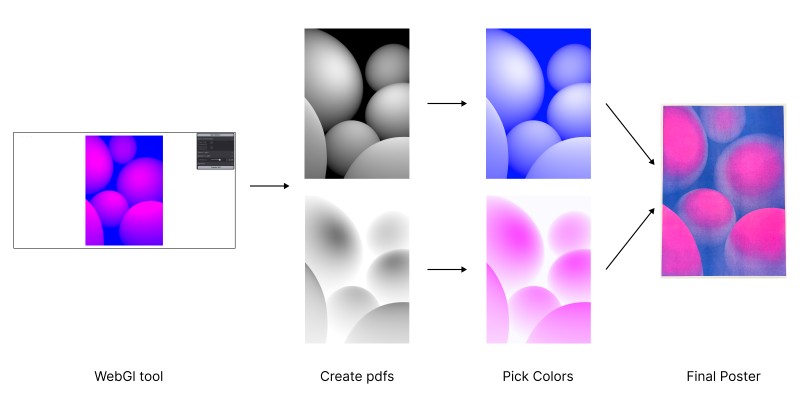
By bridging the gap between digital and physical mediums, you can find a lot of unexpected and fun results. In this tutorial we will learn how to develop our own tool to create Riso posters using Three.js. Below are steps to create a very basic editor, where spheres can be added and moved around. We will then use post processing to export printable PDFs. Finally find a Riso lab, pick your colors and print the poster. The goal for this setup is to offer a solid starting point for you to create your own tool.

Workflow
For our workflow, it’s important to understand that the colors of the rendered image are independent of the printed colors. Our goal with this tool is to create two PDFs, each representing the intensity of one color. The final colors can then be selected from the available Riso colors. So, just because the image appears blue and pink does not mean the printed poster has to be blue and pink, you could choose yellow and green as well. During the process of creating this Article I just got attached to blue and pink, which is why I chose those colors for printing.
Understanding Riso Printing
So, let’s start from the beginning and understand the fundamentals of Riso printing. Riso printing is a digital screen printing technique. It works similar to a normal printer by depositing ink on paper, but offers way more interesting and vivid colours. You can think of it in the same way as how an analog camera creates a more interesting picture than a digital camera.
Traditionally, Riso is used by graphic designers and illustrators, but as developers, we can use it to enhance our work and create something tactile. Plus, the Riso process adds a natural texture that gives even flat colours a unique look. Therefore in our tool we are not going to focus on creating fancy shaders but will rely on the printing process to shape our final image.
As opposed to digital platforms, when printing we cannot choose from an infinite colour wheel, just a limited ink selection. These available colours can vary across print shops.
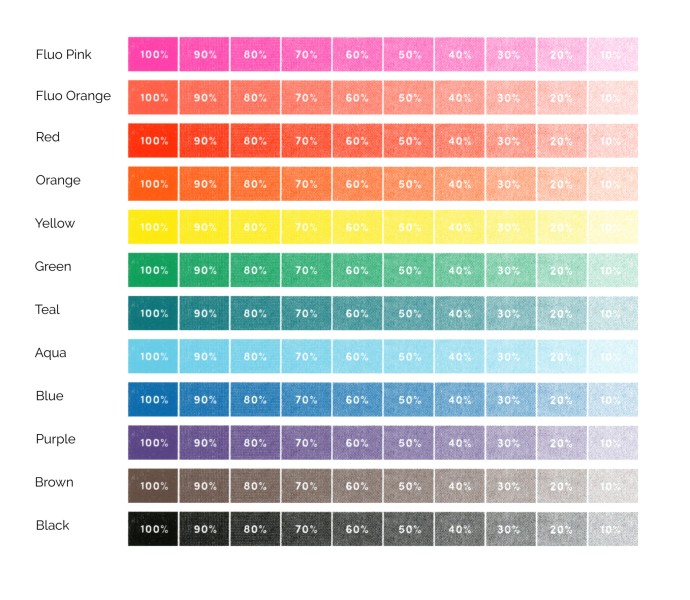
Source: https://outoftheblueprint.org/files/
Creating a tool
Since we already know that the printing process will take care of adding visual interest through texture, we can focus on creating an interactive editor. We want something where we can add spheres, move them around and scale them. Then we will use the three.js post processing pipeline and pdf.js to create our print ready PDFs.
WebGL setup
When creating our WebGL scene we need to be aware of multiple things. Since the goal is to create a print ready PDF we want the scene to be higher resolution than what would make sense for any realtime application. In order to save the canvas as an image we need to set preserveDrawingBuffer: true in the renderer.
const renderer = new THREE.WebGLRenderer({ canvas, camera, preserveDrawingBuffer: true, antialias: true,
})
When setting the size of the scene we don’t want the scene to be fullscreen, but keep the same aspect ratio as the A3 paper we will be printing on.
const sizeCanvasToA3 = (wrapper) => { const bounds = wrapper.getBoundingClientRect() const width = bounds.width const height = width * (OPTIONS.height / OPTIONS.width) if (height > window.innerHeight) { const height = bounds.height const width = height * (OPTIONS.width / OPTIONS.height) return { width, height } } return { width, height }
} const resize = () => { const { width, height } = sizeCanvasToA3(canvasWrapper) camera.aspect = width / height camera.updateProjectionMatrix() renderer.setSize(width, height) composer.setSize(width * 2, height * 2)
}
Shapes
We want to keep this simple and just create some spheres that can move around and scale using the three.js transform controls. The material of the sphere will be a MeshPhysicalMaterial so that we can use lights to control the color of the spheres.
const geometry = new THREE.SphereGeometry(1, 48, 48)
const material = new THREE.MeshPhysicalMaterial({ color: 0xffffff }) const mesh = new THREE.Mesh(geometry, material) const control = new TransformControls(camera, renderer.domElement)
Lighting
Lighting will be the way we shape the appearance of our spheres. Remember, the actual color does not matter, just the intensity of one channel. In this example, we will have one ambient light that is completely blue and one point light that is completely red). Red and blue are two different color channels and that makes it easy to split the colours and create two masks in our post processing pass.
const ambientLight = new THREE.AmbientLight(new THREE.Color('#0000ff'), 3.2) const pointLight = new THREE.PointLight(new THREE.Color('#ff0000'), 8, 10)
pointLight.position.set(1.2, 1.8, 1.5)
Controls
After creating a basic setup, we want to develop this into a basic editor. For this, we will be using Tweakpane. Tweakpane is nice because it allows for easy modification of properties and enables grouping values into folders. For example, this is how the values for the Point light are set up.
const pointLightFolder = gui.addFolder({ title: 'Color 1 (Point Light)', expanded: false,
})
pointLightFolder.addBinding(pointLight, 'position')
pointLightFolder.addBinding(pointLight, 'rotation')
pointLightFolder.addBinding(pointLight, 'intensity', { min: 0, max: 15,
})
pointLightFolder.addBinding(helper, 'visible', { label: 'Show position',
})
Post Processing
Now that we have a little editor, some spheres and lights in our scene, we need to take care of creating our PDFs. In order to do this properly, we need two post processing passes. One that only renders the red channel and one that only renders the blue channel. Then we can toggle these passes and create a PDF with each one.
First, we will setup an Effect composer which enables us to add post processing passes. Then, we need one render pass (so we can grab the scene), our two colour passes, and a final output pass. Initially we will disable both colour passes, because having both enabled at the same time will result in a completely black image.
// Will just grab the red value of the rendered image
const RedShader = { ... fragmentShader: `
uniform sampler2D tDiffuse;
varying vec2 vUv; void main() { vec3 color = texture2D(tDiffuse, vUv).rgb; float red = color.r; gl_FragColor = vec4(red, red, red, 1.0);
}`,
} // Create EffectComposer to chain render passes
const composer = new EffectComposer(renderer) // Create all necessary render passes
const renderPass = new RenderPass(scene, camera)
const redPass = new ShaderPass(RedShader)
const bluePass = new ShaderPass(BlueShader)
const outputPass = new OutputPass() // Add passes to composer
composer.addPass(renderPass)
composer.addPass(redPass)
composer.addPass(bluePass)
composer.addPass(outputPass) // Disable passes since they are just necessary for debug purposes // and when creating the pdfs
redPass.enabled = false
bluePass.enabled = false
Generating the PDFs
Now that we finally have everything set up, we can take care of creating the PDFs. Most Riso printers will require a 10 Millimeter border around the edge of the PDF so that the paper does not get stuck to the printer.
Since our post processing is in place we can enable one pass, render our scene, grab the canvas as an image, add that to the PDF in the correct size and then do the same with the other pass.
const createPage = (name, canvas) => new Promise(async (accept) => { const { borderMM = 10, format = 'a3', width = 297, height = 420, } = OPTIONS const pdf = new jsPDF({ format }) // Add a background color to the pdf pdf.setFillColor('#fff') pdf.rect(0, 0, 9999, 9999, 'F') await wait(100) // Save the canvas as an image const image = canvas.toDataURL('image/jpeg', 1.0) await wait(100) // Add image to the pdf const imageWidth = width - borderMM * 2 const imageHeight = (imageWidth / width) * height const x = borderMM const y = (height - imageHeight) * 0.5 pdf.addImage( image, 'JPEG', x, y, imageWidth, imageHeight, '', 'NONE', 0 ) pdf.save(name) accept() }) const createPdf = async (canvas, composer = {}) => { const redPass = composer.passes[1] const bluePass = composer.passes[2] // Show just red color redPass.enabled = true bluePass.enabled = false await createPage('color-1', canvas) // Show just blue color redPass.enabled = false bluePass.enabled = true await createPage('color-2', canvas) bluePass.enabled = false
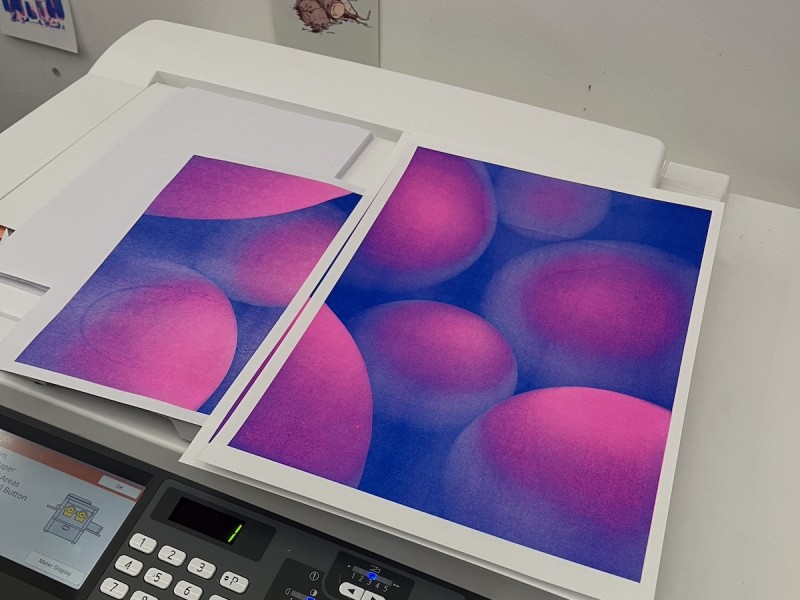
}Finally we have our PDFs and can go to our local Riso shop to make the prints!
Conclusion
I find holding something in my hands that I created with code to be a very satisfying feeling. For me, Riso is a nice way to break out of the digital world as a developer. I hope this tutorial was inspiring for you and will provide you a starting point to create your own tool. At the very least, I hope you can view Riso as a medium not only for illustrators and designers, but also for enhancing digital creation processes.