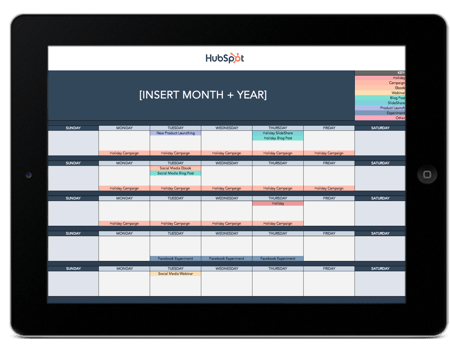
Have you been on a time crunch to create social media content?

Most of us have and it’s a stressful position to be in. Creating content in the moment it needs to be published is less than ideal for more reasons than you may realize. Not only is your content less likely to meet the needs of your audience, but you’ll also miss out on the creative social topics and events that can be planned for in advance.
In this guide, you’ll get the best social media content calendar template and a step-by-step guide explaining how to use it.
Use the Above Template to Plan Out Your Social Media Holiday Posts
What is a Social Media Calendar?
A social media calendar is a planning document that organizes your publishing schedule by date. This enables you to keep track of deadlines, better manage your content creation team, and create transparency with stakeholders who rely on your publishing schedule.
Why do I need a social media calendar?
Creating a great content calendar isn’t as simple as adding a few Instagram post ideas to your Google calendar. Let’s take at the benefits of having a social media calendar.
1. Better Organization
Having a content calendar keeps you and your team organized, which is essential when managing multiple social media channels.
Rather than coming up with content ideas on the fly, you can plan your content around your organization’s needs. It can also provide more time for creating content about trending topics and upcoming holidays and events. For instance, if your company has a big event coming up, a content calendar will help you strategize how to promote it in advance.

Best of all, a social media calendar keeps everyone on your team informed on when content is being published. This will help avoid potential miscommunication and confusion down the road.
2. Easier Scalability
Another benefit to having a social media calendar is that it can help you scale your content production without overwhelming your marketing team.
You can pace the production around your team’s bandwidth and other duties your department is responsible for by planning the content in advance.
As you scale, make sure you track post analytics to see how your content is performing. While there’s no magic number for when or how often you should post on social media, keeping an eye on performance will help you and your team determine what content engages your audience the most.
3. Higher Quality Content
Lastly, using a social media calendar ensures that your team has plenty of time to do their best work.
Planning your posts in advance allows time to double check your work and ensure there are no typos or mistakes. It also enables your team to create a cohesive and consistent brand image because you have more time to strategize and work on valuable campaigns.
Components of a Social Media Content Calendar
- Key
- URLs and UTM Parameters
- Date and Time
- Message
- Campaign
- Image
Perfecting your social media content calendar doesn’t have to be a chore. With these essential components, you’ll have a foundation to organize your social media strategy at a tactical level.
Key
As you noticed in earlier sections, your stakeholders will appreciate having an easy-to-read key that they can use to understand the information in the calendar.
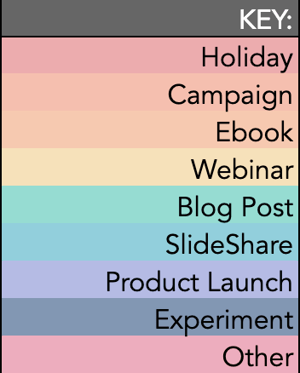
As long as your key is clear, just about anyone in your organization can view your social media content calendar and understand exactly what’s happening on all platforms.
URLs and UTM Parameters
URLs and UTM parameters are similar, but they’re not one and the same. URLs are the links you’ll want to share from your website (or even another website if you are curating content) on your social media platforms.

On the other hand, a UTM parameter is an extension of your URL. It’s a string of tracking code that’s appended to the end of the URL and it helps social media marketers track how well their posts are driving traffic to their website. By tracking and analyzing UTM parameters, you’ll be able to see what content is meeting your conversion goals and what content is better for engagement on social media platforms.
Date and Time
If you have stakeholders or other teams that rely on your social media content, you’ll quickly see the benefit of including dates and times in your social media calendar.
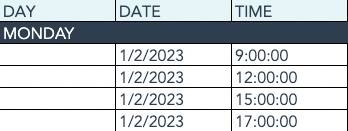
When teammates can view the calendar and identify exactly when a post was or will be scheduled, they’ll be able to quickly proceed with their workflow which is beneficial for you, too. That means you won’t be interrupted to give status updates about every Tweet on the docket for the day.
Message
Transparency and context are invaluable when it comes to social media content calendars. Giving a brief synopsis of the message or even sharing the caption for a post can go a long way in helping others within and outside your team understand what the intent of the post will be.
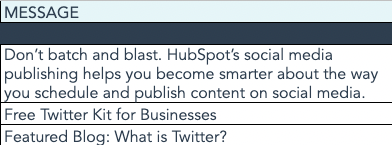
Pro tip: If you’re adding a video to your social media content calendar that isn’t finished, consider adding a short Loom video that gives an overview of what the video will be about.
Campaign
When it comes to tracking, it’s too late to start when the campaign is over. Start tracking your social media campaigns in your content calendar. You can make this prescriptive by having a dropdown list of predetermined campaign names, or if your campaigns are few and far between, simply copy and paste the names next to the corresponding content.
Pro tip: Align your campaign name with the campaign section of your UTM parameter for seamless tracking.
Image
Your social media content calendar will become just another spreadsheet without some imagery. Since much of your social media content will probably be visual, add a thumbnail-sized version of the image that will be included in the published post. Coupled with the message, stakeholders who view the calendar images will have a pretty good idea of what will be shared and when.

To make editing your images for each platform easier, check out this cheat sheet for ideal image dimensions on each platform.
How to Create a Social Media Content Calendar
- Identify your goals.
- Align your team.
- Consider diversity, equity, inclusion, and belonging.
- Decide what social channels you’ll use.
- Determine your publishing cadence.
- Set up UTM tracking.
- Create an analysis tracker in your calendar.
Step 1: Identify your goals.
The first step you want to take to build your social media content calendar is to identify your goals. These will determine how often you post, who should be involved in the content creation process, and which channels you’ll want to use.
If you’re not sure where to start with setting up your social media goals, we cover that here.
Step 2: Align your team.
With your goals etched in stone, it’s time to align your team toward these goals. Social media content creation is a tall order, especially for lean marketing teams, so don’t short yourself on resources — especially talent.
One thing we know to be true today is that video content is taking over just about every major social platform. That means you’ll want to have on-camera talent dedicated to producing video content to meet the needs of your social media calendar.
If you can, find a content creator who is well-versed in short-form written content, video content, and audio content to keep your content production moving quickly and prevent bottlenecks.
Step 3: Consider diversity, equity, inclusion, and belonging.
Diversity, equity, inclusion, and belonging are topics to consider when developing your social calendar. You’ll want to make sure your content reflects and respects the values and experiences of your audience. Moreover, the faces, voices, and stories you share on social networks should be representative of your audience and the larger community where your business operates.
This isn’t something that can happen by accident, so you’ll want to plan for diversity and inclusion as you develop your content calendar. If you’d like some guidance on creating diverse and inclusive content, check out our original research on the topic.
Step 4: Decide what social channels you’ll use.
Every social channel is different and the content you post on each one should appeal to the layout of the platform and the users who use it.
If you’re a seasoned marketer or have a large team, you may find that using all of the popular channels and even experimenting with a new one could be beneficial to the goals you set in step one. However, if you’re a team of one, or your team is already stretched thin, it’s OK to start with a few social channels and work your way up to more.
Step 5: Determine your publishing cadence.
Similar to starting small and working your way to more social channels, the same applies to your publishing cadence. It’s not uncommon for brands to post daily on platforms like Twitter while posting once a week on LinkedIn may be more than enough to keep that audience engaged.
Take a look at the research for each social media platform you plan to use to get a sense of the posting cadence best practices. Then, compare that to the bandwidth on your team and the goals you want to achieve. Remember: the goal of a social media calendar is to create and publish a sustainable stream of content to your audience — it’s a marathon not a race.
Step 6: Set up UTM tracking.
One of the most important parts of a social media calendar is actually the part you don’t see — analytics and tracking. The easiest way to track how your social media content is performing is to use UTM parameters to track it. “UTM” sounds like a scary acronym, but they’re simple to set up and use.
Once you’ve got them in place for each link on your social media posts, you can review the metrics of your social media content.
Step 7: Create an analysis tracker in your calendar.
For stakeholders who want to stay abreast of how well your social media content is, create a tab that shows clicks, views, engagements, and other metrics you plan to track to deem your content a success. Tracking analytics can be as simple or detailed as your team prefers.
For a full list of metrics to track and tools to do it, take a look at this year’s Ultimate Guide to Social Media Analytics.
Social Media Content Calendar
If you don’t have time to create your social media content calendar from scratch, start with HubSpot’s free social media content calendar template.
The calendar has everything you need to plan your social media content, coordinate campaigns, grow reach and engagement, scale posting schedule, and boost productivity. Download it now, and follow along with the steps below.
Featured Resource: Social Media Content Calendar Template
How to Use HubSpot’s Social Media Content Calendar Template
The following subsections will show you how to fill out each of the tabs you see in this template — Twitter, Facebook, LinkedIn, Instagram, and Pinterest.
Step 1: Review the Monthly Planning Calendar tab.
The tab Monthly Planning Calendar provides an overall snapshot of your monthly social media campaigns. It’ll help you coordinate with other stakeholders and keep all the moving parts in order. Here’s what it looks like:
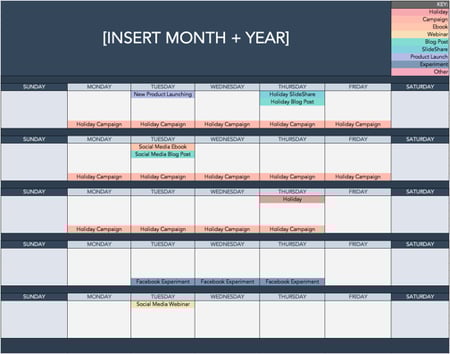
There are three sections to take note of when you edit this template. First, the color-coding key. Each color represents a type of content or campaign you might coordinate, like ebooks, webinars, blog posts, product launches, and so on. Though only some of these might be relevant to you, they’re just the beginning of what you may want to include here — so be sure to add and remove categories that align with your own types of content.
The other two sections you’ll need to edit are the Month and Year at the top of the calendar, as well as the cells below each day of the week. In those cells, you should enter the type of content you’ll be promoting that day and color-code it to align with the campaign it’s supporting.
Instead of deleting all the content in this spreadsheet each month, I recommend copying this worksheet twelve times over and creating a separate sheet for each month. (If that gets to be too overwhelming, you can always save those tabs as a separate workbook.)
Step 2: Populate your first social channel in the calendar.
Alright, now let’s get to the social media content part of the calendar. For the sake of this blog post, we’ll use Twitter as an example, but these steps will work for each social channel tab in the template.
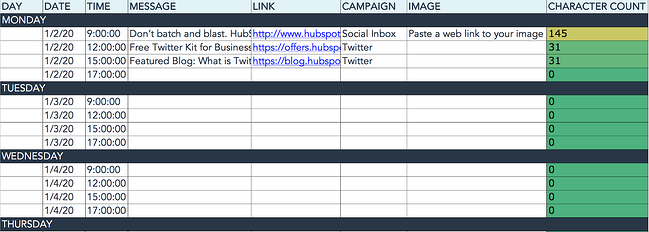
Let’s say you want to add some tweets to your scheduling template. Scroll over to the Twitter Updates tab in the content calendar spreadsheet, where you’ll see this:
Day, Date & Time
The first four columns, Day, Date, Time, and Date & Time are there for your convenience, and if you choose to use a third-party app for pre-scheduling your tweets (like HubSpot’s Social Media Management Software), then these columns will be useful. For now, just fill in the date for when you’ll publish updates to Twitter, and the time at which you’d like them to go out. The Date & Time column will automatically change based on what you type in the previous two columns.
Message
Now, let’s move over to the Message column. Here, input the copy you’d like to appear in your tweet, bearing in mind you should cap it at 217 characters to allow enough room for a link. (Read this blog post for a full character count guide.) This spreadsheet will auto-calculate the number of characters you’ve entered to keep you on point, turning yellow and eventually red as you approach 240 characters.
Link
After you’ve composed your tweet, paste the URL you’d like to include in your tweet in the Link column. Be sure to include UTM parameters so you’ll know whether these tweets are driving traffic, leads, and customers. This is an important step to remember if you’d like to demonstrate ROI from social media. You can also use the Campaign column to add an associated campaign which helps with more detailed tracking and reporting.
Image
Finally, in the Image column, attach the tweet’s image (if you have one). For Twitter, we recommend images that are 1200 x 670 pixels.
(Click here for a full cheat sheet of social media image sizes.)
If you’re having trouble attaching your image to the spreadsheet, follow these steps:
Step 1: Click on the cell where you’d like to place your image.
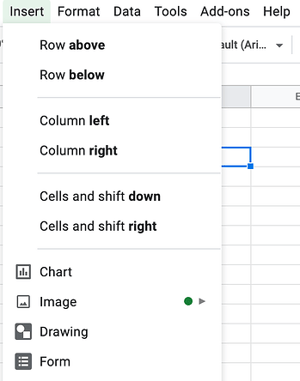
Step 2: Click Insert in the top row, then click the Image button, and finally, click Image in cell to choose your image.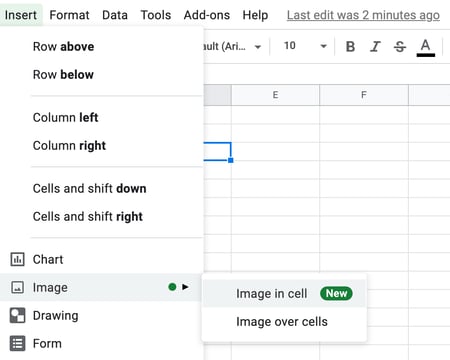
Step 3: In the Insert image window, choose the option your photo will come from. In this example, we uploaded an image from our computer.
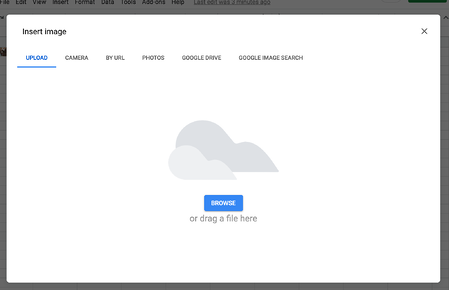
Step 4: You’ll now see the image appear in the cell.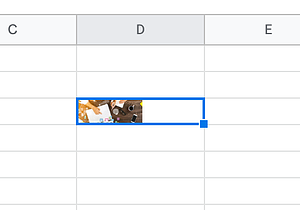
Pro Tip: This process is just for organizational purposes. If you decide to upload the spreadsheet to your social media publishing software, it will not attach — you’ll have to do that manually. If you’re a HubSpot customer, details for how to bulk upload your Twitter content to the HubSpot Social Publishing Tool can be found within the downloaded template.
Don’t Forget to Interact With Your Followers
Whether you use this spreadsheet to plan your content or upload it to a third-party app, you’ll still need to supplement these updates with on-the-fly content. Breaking news hits? Whip up a quick update to share it with your network. Did someone in your network tweet something interesting? Give it a retweet with some commentary. Got a fascinating comment on one of your updates? Respond with a “thank you” for their interaction.
Coming up with and scheduling your social media content in advance is a huge time-saver, but it should go without saying that you still need to monitor and add to your social presence throughout the day.
Finally, we encourage you to experiment with your social media publishing. This template provides publishing dates and times for each social network, but you may find those are way too many updates for you to fill, or perhaps too infrequent for your booming social presence. If this is the case, you should adjust your social media publishing frequency as needed.
Now that you’ve got the ins and outs of a social media content calendar, download the one below for free and start planning your content.
Editor’s note: This post was originally published in January 2020 and has been updated for comprehensiveness.


![→ Free Download: Social Media Calendar Template [Access Now]](https://no-cache.hubspot.com/cta/default/53/3e56e15d-47bd-46c9-a256-99fde52abfe7.png)
